Thu Feb 16, 2012 9:40 am
Map Name:
Spawn (Bravo, Mid, Alpha):
Bravo AND Alpha
Tier 1
Describe the pathing you used on the map to advance and/or defend to the territory or territories.
Alpha: (Attacking Elites) Up the mountain to fight with Alpha Spartans before we even had access to the territory. This was essential because we could not simply run straight to the hill as the spartans would simply rain fire from above and at our flank.
(Defending Spartans) Similar tactic, meet the elites head on in the mountain to prevent them from getting hill time and supporting the middle team with a NeRf. Once the Elites took the mountain spartans had to clear the hill and clear the mountain but not necessarily in that order.
Bravo: (Attacking Elites) Dismount from the dropship and grab the NeRf... there was little room for Cross map shooting on the Spartans which sucked. The Spartans over at Alpha were well hidden by rock structures but killing the spartans off the Bravo building itself was fairly easy enough, however, pushing beyond the structure into the hill is VERY tough.
(Defending Spartans) Solid attackers were tough to fend off but the attacking middle team were a very powerful flank. So much so that I think if the Bravo Elites were to hold the building with a NeRf they could support the middle team in taking bravo. BUT As long as the Bravo building was held by spartans then the bravo elites were not a problem.
Which territory did you find most vulnerable and why?
Alpha was most vulnerable but they were VERY close. This was because Bravo was very open and it was hard to take and hold the bravo structure while keeping the alpha mtn, which PROVIDED cover to alpha itself, was fairly easy so long as you can keep the Alpha spartans spawn killed (which wasn't too hard to do really)
If your spawn had a DMR/Needle Rifle, how did you use it?
As a counter to the Spartans DMRs, the NeRf was used to clean up the one shot spartans and put pressure from a safe distance onto the those aggressive spartans that were trying to spawn kill.
Describe the setup used, if any, to take/defend the territory or territories.
Holding the Alpha Mtn and/or the Bravo structure are ESSENTIAL to taking T1.
Tier 2
Which power weapon (if any) spawned near you? How did you use it?
The 2nd playthrough was a mutual skunk ( I believe) but during the 1st playthough I spawned with the sniper. I took the sniper back into the base and put shots into the banshee and made a few elites one shot before I was taken down by an aggressive attacker who was then cleaned up by my battle buddy.
Which territory did you feel more inclined to attack and why?
As A and B I knew which territory was mine to attack but I did try several time to go to mid to help take pressure off of THEM so they could go to the other side of the map, thus shifting all the attackers to the left OR the right.
Describe the power positions, if any, you noticed for the defenders.
The mountain on Alpha and the Structure in front of Bravo... the middle team didn't seem to have a position of power.
Describe the vehicle gameplay you noticed for tier 2.
Revenant and warthog met rarely as the warthog was usually countered by PP, Stickies, and blueberries and the revie was taken out by team fire and sniper but the revenant did a good job of suppressing the spartans while the elites got some hill time.
Tier 3
Did any new power weapons spawn near you? How did you use them?
I help a laser at one point but did nothing with it, the Sniper was still useful as anti-everything.
Did you find the core easy to attack/defend? If so, why?
I found that most of the action occurred outside of the core building and that once the core was pulled it was very hard to defend. Because most of the action took place away from the core itself it seemed as though no one was in position to stop the pull.
Describe the setups used to attack/defend the core.
Scorpion was essential to not only slay but also distract the elites and take down the banshee.
The Elites should use the Focus Rifle to clean up the sniper and keep the Spartans distracted by using their beam. As usual, concussion rifles are a good counter to AL Shotgun.
Describe the vehicle gameplay for tier 3.
Scorpion beats banshee but the scorpion was taken out by plasma launcher, PP, stickies fairly easily. The Revenant stayed alive by keeping near the core cap and out of way of the scorpion. The ghost was a constant bother but it was mostly a distraction just like the warthog.
Miscellaneous
Did you enjoy the map? Explain why or why not.
Yes, once the game moved past the the first phase which was very "Fast Paced" by which I mean everyone died a lot and got frustrated by said death. The later phases were more strategic and offered more map/cover.
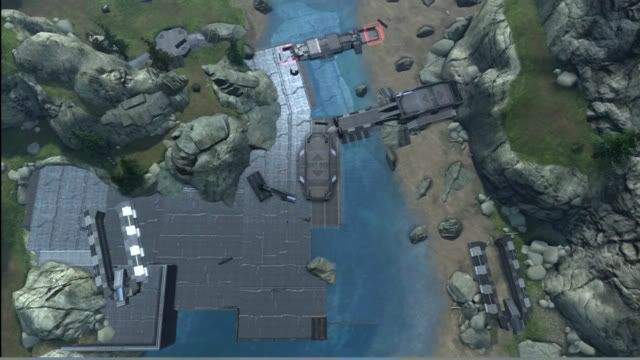
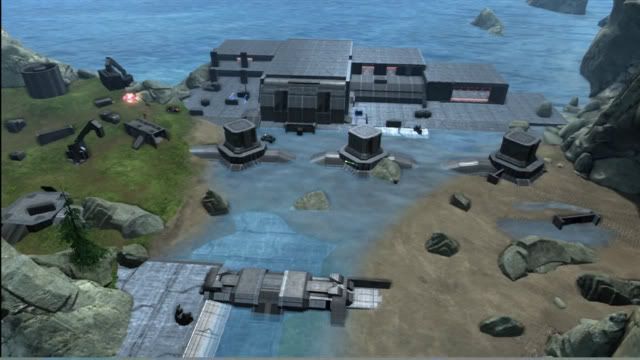
Did you notice a theme/location to the map? If so, what did you think it was/
There was water as the name "Docks" alludes to but the map overall didn't seem much like a real Dock... not that I know what a UNSC dock would look like in the year 2500 but I digress.
Provide any addition feedback you may have here.
The 1st Tier is going to be tough to alter but I don't think its perfect just yet. The Elites have very little opportunity to cross map shoot which isn't not required but is something that would help.